Wednesday, November 30, 2011

Wednesday Sewing - Bean Bag Snowman


While I was out shopping last week, I found some fun Christmas bean bag dolls - for definitely not fun prices!  How hard could it be to come up with some patterns?  Hmmm .... apparently harder than I thought!  After several too skinny versions, I managed to have a snowman turn out like I wanted.  These could also be stuffed with fiberfill, rice, plastic pellets - or anything else you have on hand.

Materials:
*heavy white felt or fleece
*small amount of colored felt for hat and scarf
*scrap of orange felt
*brown embroidery thread
*12mm solid black locking eyes
*package of small white beans
*small amount of fiberfill
*patterns found here

1.  Using the patterns, cut two snowman shapes from white, two carrot noses from orange, and two hats.  Cut a 1 inch by 16 inch strip from hat/scarf color.

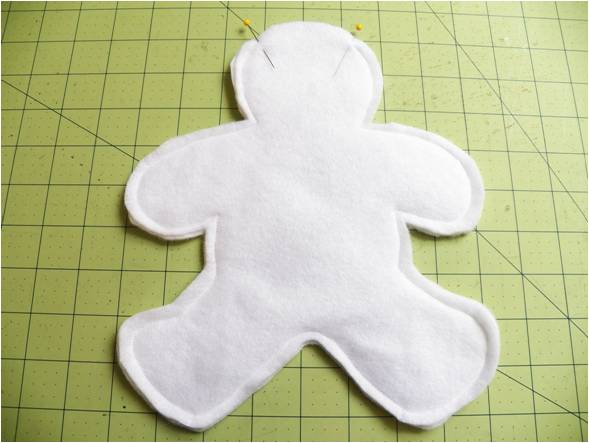
2.  Pin snowman shapes together.  Sew, using a 1/4 inch seam allowance and leaving an open hole between on the head between the pins shown below.


3.  Fill one leg tightly with beans.  I found a funnel helped.


4.  Sew across the top of the leg.  If you're using fiberfill, you can do this by machine, but if you're using a bulky filling (like beans), stitch it by hand.  I tried using the machine, and after two broken needles decided by hand would be better!


5.  Repeat with the other leg and with the arms.


6.  To add eyes, lay the locking washers where you want the eyes to go and make a pencil mark through the center of each one.  Make a very small hole on top of the pencil mark.


7.  Push an eye through each hole.  Put the locking washer over the post behind the eye and push until it sits tight against the fabric.


This is your snowman so far!


8.  Sew the two nose pieces together by hand.  Stuff and sew onto face.


9.  Using 2 strands of the brown embroidery thread, sew lines on the nose to make it look like a carrot.


10.  Fill body and halfway up the head tightly with beans.


11.  Sew head shut, leaving a small hole open.  Don't worry too much about what the sewing looks like - this part of the head will be covered with his hat.


12.  Finish stuffing with beans and sew completely shut.


13.  Sew the two hat pieces together and turn right side out.


14.  Turn brim up twice and sew in place.


15.  Cut 8 or 10 narrow pieces of felt.  Sew together in the middle, sew onto hat for a tassel, and trim.


16.  Sew hat onto head.


17.  Cut fringes on both ends of the long strip of felt.


18.  Tie scarf around the snowman's neck and you're finished!  He looks lonely, though - I think I'll have to make him some friends!


Happy Creating!  Deborah
Monday, November 28, 2011

Monday Project - Play Kitchen Oven Mitts


The Thanksgiving holiday weekend was wonderful, little c loved her surprise kitchen (I'm sure you figured out what it would be from all the felt food!) .... and with all the photos I took, I forgot to take one of her "cooking."  So here's the big reveal without the chef!  I ended up ordering the Doug and Melissa little kitchen set from Amazon - a very nice, compact set.  You can read more about it here (no, I don't get a kick back).

The last project for the kitchen is a set of toddler/preschooler oven mitts.  On the materials list, you're going to notice I have Insul-Brite listed.  This is an insulating fabric with foil in the middle that is great to use for oven mitts and potholders.  Why am I putting it into play oven mitts?  While toddlers/preschoolers should not ever be using these mitts on anything really hot, the mitts are an adult tool and I have a strong opinion that play versions of adult tools should really work.  Children this age do not have the experience to know that their play tools don't work like the adult ones and they really, really want to be big and do what Mom, Dad, Grandma, whoever is doing.  Supervision, supervision, supervision is the key word here, however, toddlers/preschoolers are very determined (that's why we have pool fences and automatic locking gates in this part of the country) and my feeling is that they should have the protection of a truly working tool if they do manage to get into a situation where they're trying to use it.

Materials:
*Small amount of fleece
*Small amount of Insul-Brite
*double fold extra wide bias tape (3 1/2 inch wide)
*pattern found here

1.  Cut four of pattern from fleece and four from Insul-Brite.


2.  Pin mitts together by layering one piece of Insul-Brite, one piece of fleece right side up, the other piece of fleece right side down, and the second piece of Insul-Brite.


3.  Sew in a 1/4 inch seam and turn right side out.


4.  Pin wrong side of bias tape to right side of mitt.  Turn ends under.  Sew along fold line.


5.  Fold bias tape down.


6.  Turn mitt inside out enough so that you can fold the bias tape over the edge and pin in place.


7.  Hand sew edge of bias tape in place and turn back to right side out.


Happy Creating!  Deborah

Friday, November 25, 2011

Friday Inspiration - Linda Marcille's Silk Painting

Autumn Pasture


I have the perfect site for a nice morning of inspiring browsing!  Grab a cup of something hot and head over to Linda Marcille's gallery of amazing silk paintings. 


Old Hutchinson Place


There are a lot of things I love about her work - her rich color palette, the country landscapes are something different than I'm used to seeing done on silk, her impeccable skill .... I could go on and on!


Linda also has a great walk through of her silk painting process here.


I used to dabble a bit with silk painting - this is making me want to dig out my old supplies and get a little more serious about it.

Happy Creating!  Deborah

Wednesday, November 23, 2011

Wednesday Sewing - Gift Bags


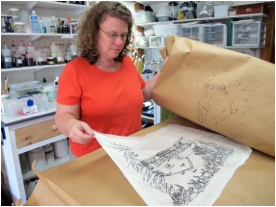
While you're out shopping this weekend, keep an eye out for discounted Christmas fabric and ribbon.  It's really easy to whip up great looking gift bags!  I worked on two different types from the same pattern this week.  One is simply made from Christmas themed fabric and sheer ribbon and the other uses iron on transfers on osnaburg (a coarsely woven cotton).  My original plans were to use watercolor pencils to actually draw designs on the cotton bags .... after doing one, I realized there was no way I'd be able to finish the number of bags I wanted by Christmas!  This looks like a next summer project!  So I drew the designs, scanned them, printed them out on iron on transfer paper, and ironed them on.  Easy and quick!  I've given you the link to a page you can print out and use if you're also feeling short on time.

Materials:
*2 9 inch by 14 inch rectangles of fabric for each bag
*1 two foot piece of ribbon for each bag
*optional iron on transfer designs found here

1.  Cut two 9 inch by 14 inch rectangles from fabric.  This makes a bag about 8 x 12 inches.  To make one in a different size, add one inch to your desired width (1/2 inch seam allowance on each side) and 2 inches to your desired height (1/2 inch seam allowance on the bottom and 1 1/2 inches for the top).


2.  Pin pieces right sides together and sew down one side, across the bottom, and up the other side, using a 1/2 inch seam allowance.  The sewing didn't show up in this photo, so I added in red lines showing where to sew.


3.  Mark diagonally 2 inches across each bottom corner.


4.  Sew and trim.


5.  Turn top edge under 1/4 inch and iron in place.  Turn under again 1 3/4 inches and sew.


6.  Pin center of ribbon in center of the back of the bag - make sure you only pin it to the back of the bag.


7.  Sewing only through the back of the bag, attach the ribbon in an hourglass shape to hold it securely.


8.  Add present, tie bow, and admire!


9.  To make a bag using one of the iron on transfers, I found it easiest to iron the picture onto one of the rectangles before sewing the bag together.  For more info on transfers, see this past post.


Happy Creating!  Deborah

Monday, November 21, 2011

2011 Felt Ornaments Part 2


Here are this season's final two felt ornaments - a gingerbread candy house and a cardinal (you can find the first two ornaments here).  The cardinal seemed a good choice this year for those of you baseball fans still celebrating in St. Louis - and for those of us often suffering Cardinal football fans, we'll just call it a Christmas Cardinal!

Materials:
*red, dark red, black, tan, white, sparkling white, yellow, orange, green, purple, and brown felt
*red, black, white, yellow, orange, green, purple, and brown embroidery floss
*1/8 inch white ribbon
*assorted beads
*large hole bead
*patterns found here

Cardinal:
1.  Cut two each of large silhouette and large wing from red felt, two each of small silhouette and small wing from dark red felt, and two masks from black felt.


2.  Use a blanket stitch to attach all pieces together.  I used three strands of floss for everything except for attaching the mask, where I used two strands.  Attach small silhouette to large silhouette.


3.  Attach large wing and then small wing.  Repeat with the remaining pieces, making sure to the two sides  face opposite ways.


4.  Attach mask.  Using beads, add an eye.  I used a small flat shell bead and hooked it on with a red bead - to do this, come up through the first bead, add second bead to your needle, and go down through the first bead.


5.  Cut 12 inches of ribbon.  Pin front to back with the ribbon in between the layers - putting about an inch of the ribbon in between the front and back.


6.  Attach front to back, again using a blanket stitch.  Thread a large holed bead onto the ribbon and tie a knot above it.


Gingerbread House:
1.  Cut two house shapes from tan felt, one roof and one snow ledge from sparkly white felt, two large candy canes and one small candy cane from white felt, one door from chocolate brown felt, assorted gumdrops from different colors of felt, and a long 1/4 inch wide strip of red felt.


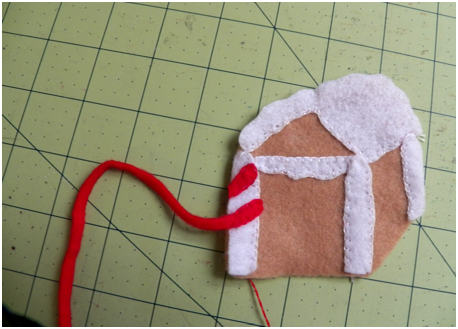
2.  Use a blanket stitch to attach all the pieces.  I used two strands for everything except attaching the front to the back.  I used three strands for this.  When attaching pieces, don't sew on the outside edge - you'll only sew on this edge when attaching the front to the back.  Attach the snow roof and snow ledge.


3.  Attach the two large candy canes to the front corners of the house and the small candy cane to the back corner.


4.  Lay one end of the red felt strip across the top of one candy cane.  Sew in place.


5.  Trim along the outer edge and repeat to make the next stripe.


6.  Repeat to make stripes on all the candy canes.


7.  Add gumdrops.


8.  Attach beads around the door - I used frosty white beads to secure the larger beads on.


9.  Cut 8 inches of ribbon.  Pin front to back with the ribbon in between the layers - putting about an inch of the ribbon in between the front and back.


10.  Attach front to back, again using a blanket stitch.


Happy Creating and Happy Thanksgiving to my US readers!  Deborah